

Shipments is the tracking workspace for packages that have a label or have left the building. Open it at Operations > Shipping > Shipments. Rate Shop Preview is a separate quote-only page. It does not buy labels, validate final customs data, or fulfill packages.
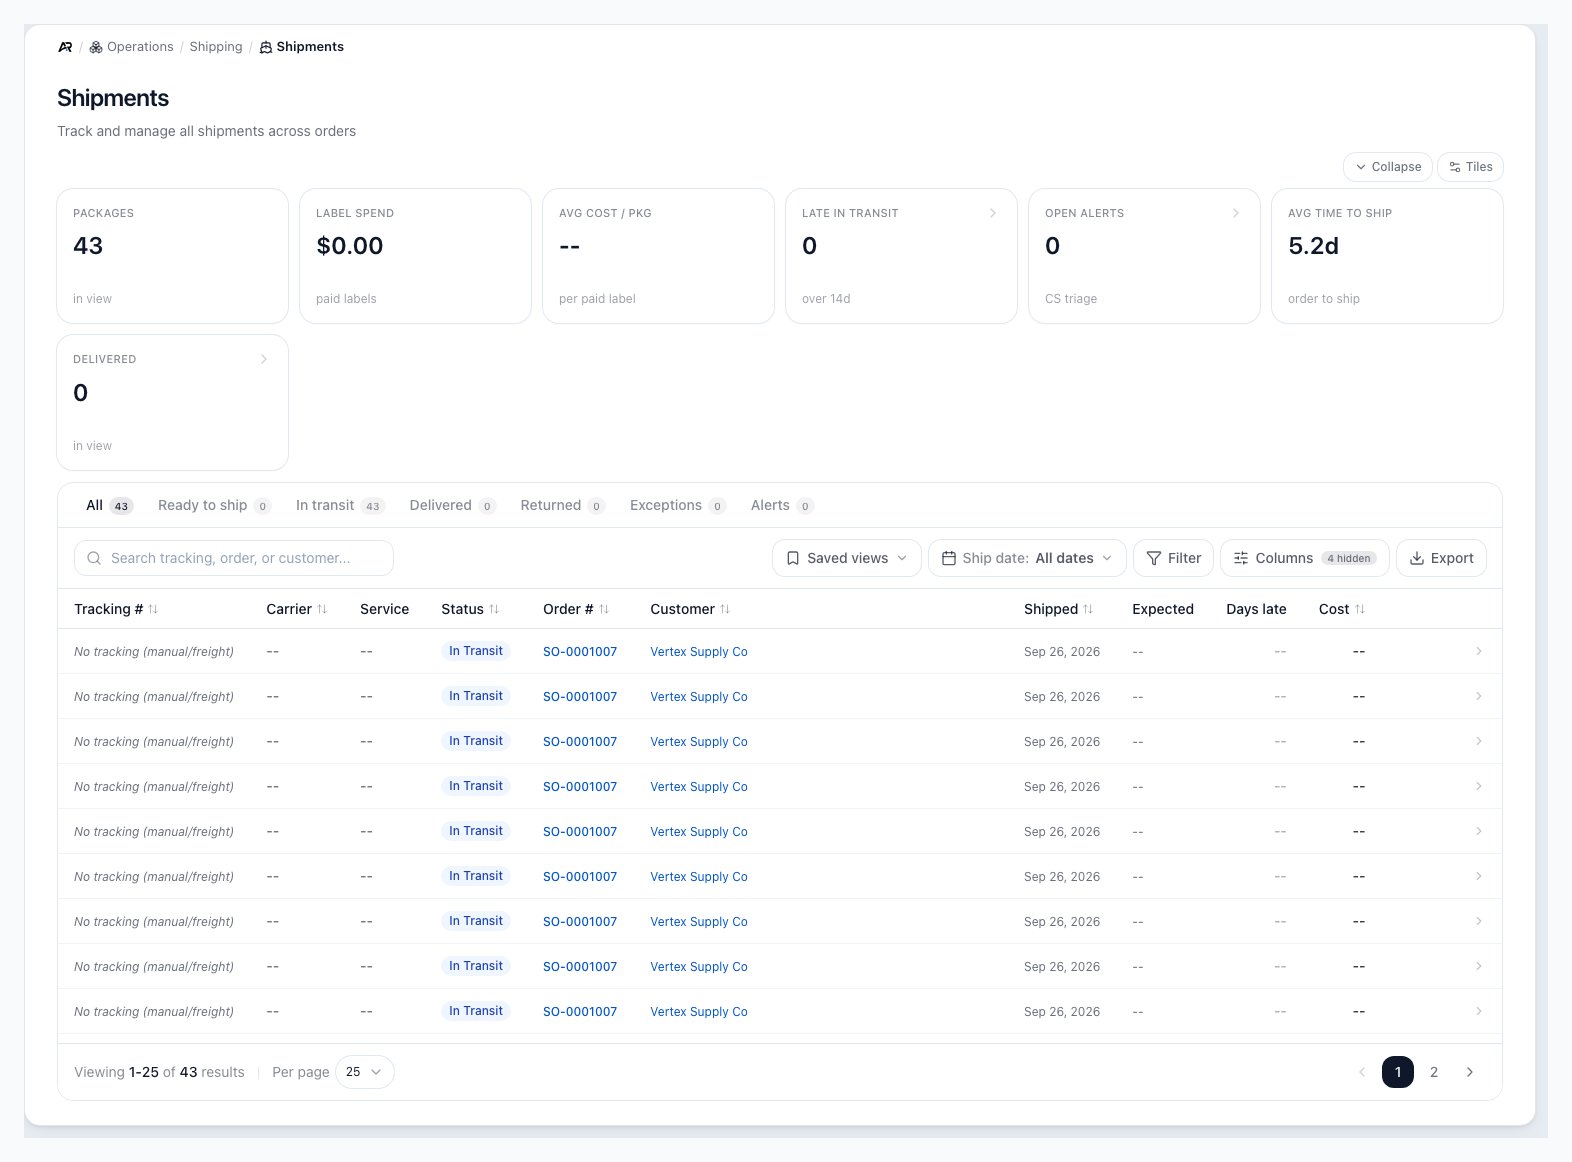
Shipments opens on the All tab, with the summary tiles above the status tabs, the search and filter controls, and one row per package.
Before You Start
- Permissions: opening Shipments needs View Shipments. The Snooze and Resolve buttons on delivery alerts need View Fulfillment; without it they are hidden, and the server refuses the action. The Export button needs Export Data, and the Everything, all fields export also needs Advanced / Bulk Data Export.
- Location access: when your user is limited to certain locations, or you pick a location in the header, the list, the tiles, and the export show only packages from those locations, plus packages on orders that have no location set.
- Which packages appear: a package appears once its label is bought, and stays through shipped, delivered, and returned. Packages still being packed do not appear. Manual and freight shipments without a tracking number appear with No tracking (manual/freight).
- Search for Shipments in the command palette.
- On an order’s package card, select the carrier logo or the tracking number. Shipments opens with that package’s drawer already open.
- On the dashboard delivery alerts card, select View all alerts. Shipments opens on the Alerts tab.
- An old bookmark to the retired late shipments page opens the Alerts tab.
Use Shipments
- Open Operations > Shipping > Shipments.
- Pick a tab: All, Ready to ship, In transit, Delivered, Returned, Exceptions, or Alerts. Each tab shows its count.
- Search by tracking number, order, or customer.
- Narrow the list with the Ship date control and the Carrier and Tracking filters.
- Select a row to open the shipment drawer.
- Review the status, tracking map, tracking events, package contents, and related records.
- Copy the tracking number, open the carrier tracking page, or print the label.

Shipments is the tracking workspace for packages with tracking numbers. New or empty sandboxes may show the empty state until orders are fulfilled.
Tabs
An Attention tab appears only when a package fits none of the other tabs. Normally it does not show.
Summary Tiles
- Packages: packages that match your filters, across every tab.
- Label spend: the total label cost of the filtered set.
- Avg cost / pkg: label spend divided by the packages that carry a paid label.
- Late in transit: in transit and past its expected delivery date, which is set when the label is bought and moves when the carrier sends a new estimate. A package with no expected date counts as late 14 days after it shipped. Select the tile to open In transit, which lists every package in transit, not only the late ones.
- Open alerts: packages on the Alerts tab. Select the tile to open it.
- Avg time to ship: the average number of days from the order date to the ship date.
- Delivered: delivered packages in the filtered set. Select the tile to open Delivered.
Columns, Filters, and Saved Views
- Columns: Tracking #, Carrier, Service, Status, Order #, Customer, Shipped, Expected, Days late, and Cost show by default. Delivered, Weight, Dimensions, and Items can be turned on from the Columns menu. Tracking # cannot be hidden.
- Sorting: select the header of Tracking #, Carrier, Status, Order #, Customer, Shipped, Delivered, or Cost.
- Days late: counted from the expected delivery date and shown in amber when the package is past it.
- Row buttons: Track opens the carrier’s tracking page (USPS, UPS, FedEx, and DHL Express). Label opens the stored label PDF so you can reprint it. The copy button next to the tracking number copies it.
- Filters: Carrier offers USPS, UPS, FedEx, and DHL. Tracking offers Has tracking and No tracking (manual/freight). Ship date offers date presets or a custom range, in your company’s time zone.
- Saved views: save the tab, filters, sort, and columns as a view. The tab, filters, page, sort, and columns are kept in the page address, so a copied link opens the same view.
- Export: choose Download this view, This view, all fields, or Everything, all fields. Every export holds at most these columns: Tracking #, Carrier, Status, Order #, Customer, Shipped, and Delivered. Everything ignores your filters and search, but still keeps to the locations you can see.
What Shows In Shipments
The drawer opens beside the list and shows:- The status badge, the ship date, and a Late chip when the package is past its estimated delivery date and not yet delivered.
- Carrier, Service, Est. Delivery, Delivered, Shipping Cost, Weight, and Dimensions when they are known.
- A tracking map with the ship-from point, the latest carrier location, and the destination.
- Tracking Events from the carrier. Before the first scan the drawer says “Awaiting the first carrier scan.” Test and sandbox labels never receive live scans.
- Package Contents: each product, its SKU, and the quantity.
- Related Documents: the order, the customer, and the return, when they exist, and the invoice when the package belongs to an invoice rather than a sales order. Each one opens that record: the order under Sales > Orders > All Orders, the invoice under Sales > Invoices > All Invoices, the customer under Sales > Accounts > Customers, and the return under Operations > Returns > Customer Returns.
- Track on the carrier, which opens the carrier’s tracking page, and Print Label when the label file is available.
Work Delivery Alerts
Arcus checks shipped packages and flags the ones running late or where the carrier reported an exception. A flagged row shows a severity chip next to its status:- Warning: the package is late, or the carrier first reported an exception.
- Critical: an exception alert has gone out for the package, or someone snoozed the alert.
Resolve an Alert
- Select Resolve on the row. The Resolve delivery alert dialog opens with the order number.
- Type a Resolution note, for example what the customer or carrier confirmed. The note is required, so Resolve alert stays disabled until you type one.
- Select Resolve alert. Arcus shows “Delivery alert resolved.” The alert clears and the package leaves the Alerts tab. If the package is still late or still has a carrier exception, the next daily check flags it again and can email the customer again, so snooze an alert on a package that is still moving.
Snooze an Alert
- Select Snooze on the row. The Snooze delivery alert dialog opens.
- Set Snooze duration in hours, from 1 to 720. It starts at 24.
- Optionally add a Reason (optional).
- Select Snooze alert. Arcus shows “Alert snoozed for 24h.” (with the hours you chose).
What Resolving and Snoozing Change
- The resolution note or snooze reason is recorded in the activity log with the order number.
- Everyone viewing Shipments sees the row update right away.
- Nothing is posted to the general ledger, no stock moves, and nothing changes at the carrier.
Preview Rates From An Order
Use order mode when a CSR needs a shipping estimate for an existing order.- Open Rate Shop Preview. It has no menu entry: open it from a bookmark, or add
/shipping/rate-previewto your Arcus address. It needs the Pack Orders permission. - Choose From order.
- Paste the order’s ID into Order ID. The ID is the long code at the end of the order page’s web address, not the order number. Preview rates stays disabled until at least 8 characters are entered.
- Select Preview rates.
- Review each carrier, service, estimated delivery date, and amount. The cheapest and fastest options are badged.

From order mode lets a CSR paste an order ID and preview rates without purchasing a label.
Preview Rates From Raw Details
Use raw mode for phone quotes, early estimates, or a shipment that is not ready for package work.- Choose Raw destination + parcel.
- Enter the recipient name, street, city, two-letter state, and ZIP. The address is treated as a residential US address.
- Enter the parcel length, width, and height in inches and the weight in pounds. They start at 12 by 12 by 12 inches and 1 pound.
- Select Preview rates. It stays disabled until street, city, state, ZIP, and weight are filled in.
- Use the result as an estimate only.

Raw destination mode is useful for phone quotes when the order is not ready for label purchase.
Understand Quote-Only Results
Rate Preview has no fulfillment side effects:- It does not purchase a label.
- It does not create tracking.
- It does not fulfill a package.
- It does not print a label.
- It does not reserve a carrier rate for the warehouse.
- It leaves out insurance. If an item needs insurance or the order is over your insurance threshold, the rate at packing time can be higher.
Common Blocks
- No shipments show: Shipments lists packages from label purchase onward. Buy the label or complete fulfillment first, and check the location picked in the header.
- Tracking events are empty: the carrier may not have scanned the package yet.
- Print label is missing: the package may not have a label PDF available.
- Snooze and Resolve are missing: the row has no active alert, or your role lacks View Fulfillment.
- “Package has no active delivery alert”: someone already resolved it. The list refreshes on its own.
- Order preview cannot find the order: confirm the order ID and the company you are working in.
- Raw preview fails: the reason shows in red under the form. “No ship-from address configured. Set a default location address first.” means your company has no ship-from address yet. When no carrier returns a quote, check the two-letter state and the ZIP. Blank dimensions are sent as 12 inches.
- Preview worked but label purchase failed: use the package workflow to resolve address validation, customs, package, or shipping rule requirements.
Related Articles
Shipping Labels
Buy labels, void labels, print labels, and understand label state.
Late Shipment Recovery
What to tell the customer and when to reship after a delivery alert.
Address and Customs Blocks
Resolve final label purchase blockers that preview may not enforce.
Label Reprint, Void, and Repack Recovery
Choose the right recovery path after a label is purchased.
Pack with Mighty
Pack packages, confirm contents, and buy final labels.
Fulfillment Station
Operations > Fulfillment > Fulfillment Station: work package queues and printer controls.
Customer Returns
Operations > Returns > Customer Returns: the return a shipment links to.
Order Lifecycle
Sales > Orders > All Orders: how an order moves from packing to shipped and invoiced.
Portal Invoices and Shipments
Understand the customer portal shipment view.