

The Department Deck
The deck is the main navigation for Arcus. It has two parts side by side. The rail is the narrow strip of department icons on the far left. Departments group the modules that belong to the same job:- Home: your Dashboard, the groups of pages you arrange yourself, and your recently visited pages. See Arrange Your Home Menu.
- Sales: accounts, orders, quotes, invoices, and products.
- Operations: inventory, warehouse, fulfillment, shipping, returns, and serial numbers.
- Purchasing: purchase orders, vendors, receiving, and manufacturing work orders.
- Finance: the accounting modules, including AP, AR, journal entries, chart of accounts, bank reconciliation, and financial reports.
- Insights: reports, the analytics dashboard, scheduled reports, the report builder, communications, and documents.
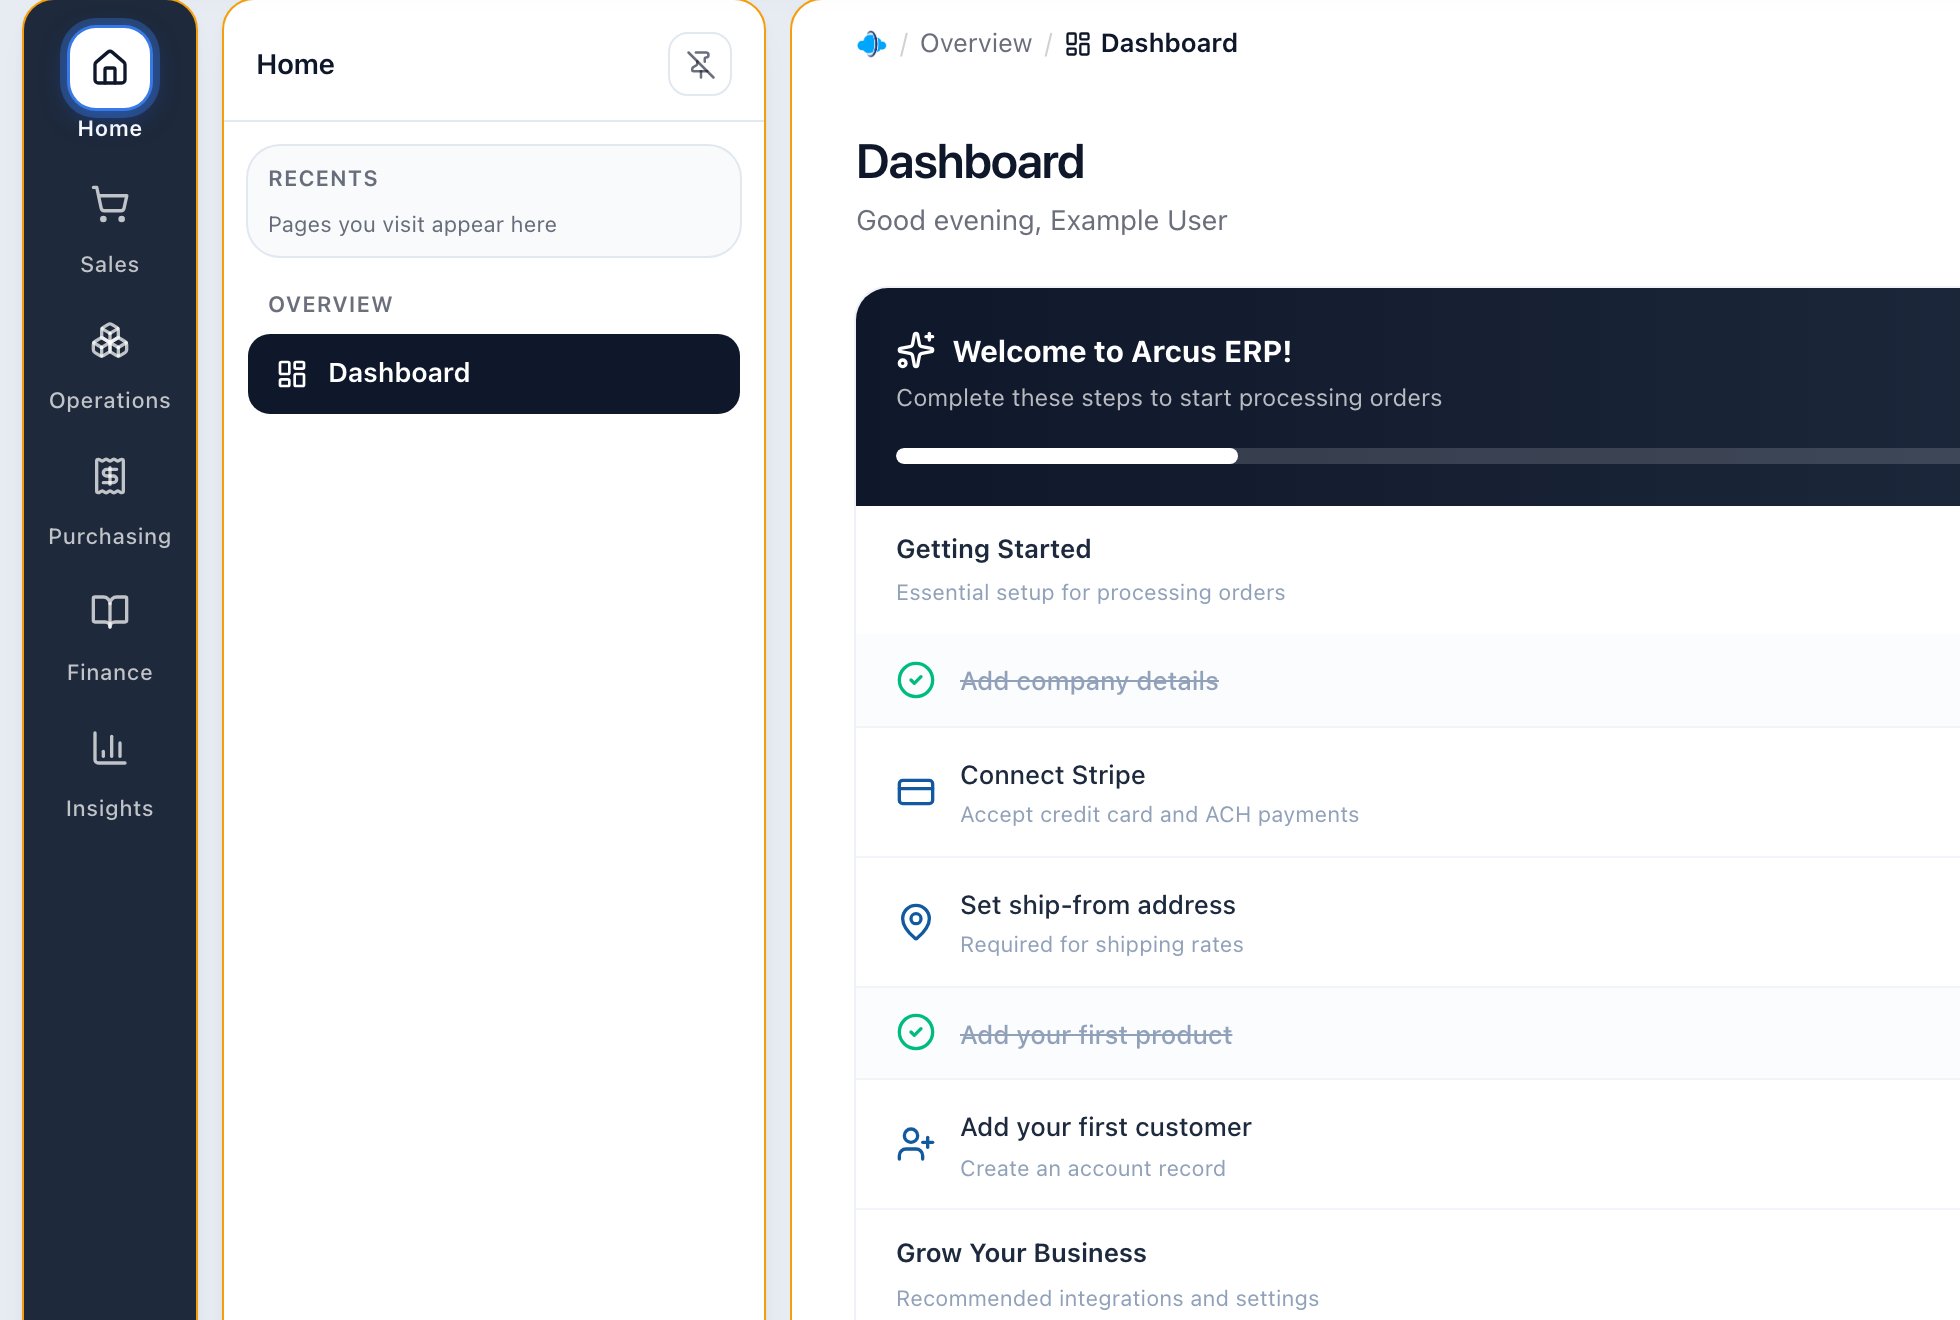
The deck: the department rail on the left, the open panel listing that department's pages, and the page content with its breadcrumb on the right.
Arrange Your Home Menu
Home starts with a single page, your Dashboard. The rest of your Home menu is yours to arrange: add the pages you open every day, collect them in groups you name yourself, and put them in the order you like. Your Home menu is private to you, so what you arrange never changes what a colleague sees.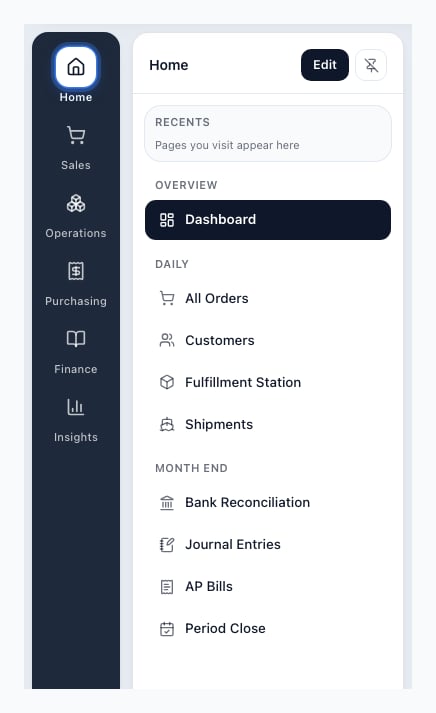
The Home panel after you arrange it: the Dashboard first, then your own groups of pages. Edit sits at the top of the panel.
Before You Start
- Anyone who is signed in can arrange their own Home menu. No permission is needed. What you can add depends on what your role can open. See Why a Page Is Missing.
- Use a window at least 1024 pixels wide to edit. That is where the rail and panels are shown. A phone or a narrow window shows your saved Home menu but has no Edit button. See Use Your Home Menu on a Phone.
- Edit mode is a draft. Nothing is saved until you press Done, and Cancel puts everything back. The one exception is the plus button on a page row, which saves at once. See Add a Page Without Opening the Editor.
Open the Editor
- Select Home at the top of the rail. If the panel is not pinned, or your window is narrower than 1280 pixels, it opens over the page and stays open while you edit.
- Select Edit at the top of the Home panel, beside the pin button.
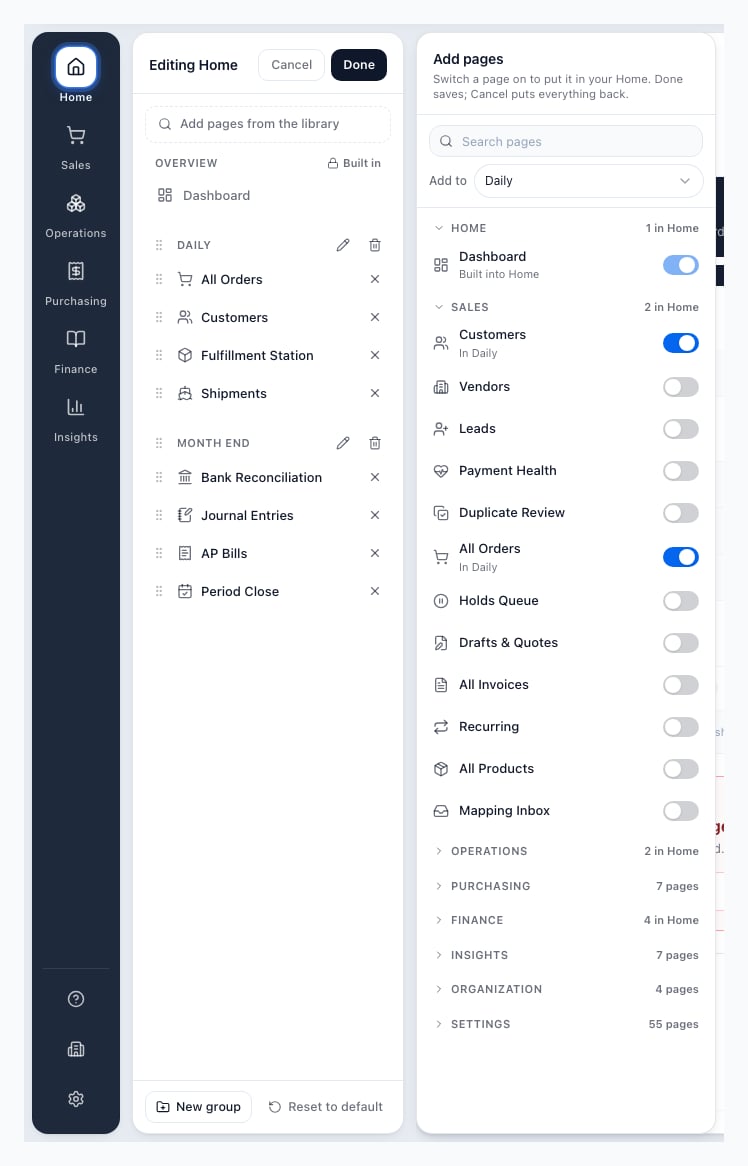
Edit mode: the Home panel reads Editing Home with Cancel and Done, and the Add pages card opens beside it.
Add Pages From the Library
- In the Add pages card, find the page. Pages are listed under the department that holds them: Home, Sales, Operations, Purchasing, Finance, Insights, Organization, and Settings. Select a department heading to open or close it. To search instead, type in Search pages. The search matches a page’s name, its department, and related words.
- Under Add to, pick the group the page should go into. Until you have a group it reads A new group, My pages, because the first page you switch on creates a group named My pages.
- Switch the page on. It joins that group, at the end. Its row now says In and the group’s name, and its department heading shows how many of its pages are in Home.
- Switch a page off to take it out of your Home menu again.
Make and Name a Group
- Select New group at the bottom of the Home panel. A group named New group appears at the end, with its name ready to type over.
- Type the name you want and press Enter. A name can be 1 to 40 characters.
- To rename a group later, select the pencil beside its name (Rename), type the new name, and press Enter. Clicking away also keeps the new name. Press Escape to cancel the rename and keep the old name.
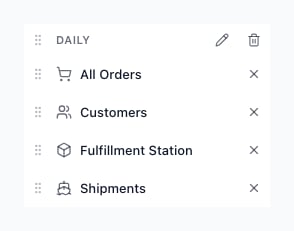
A named group while you edit: its drag handle, name, Rename and Delete buttons, and each page with its own drag handle and Remove button.
Reorder Pages and Groups
With the mouse, drag the handle, the dotted grip at the left of a page or a group. Drop a page above or below another page to reorder it within its group. Drop it onto another group, including an empty one, to move it there. Drop a group above or below another group to reorder the groups. A plain click never moves anything. With the keyboard:- Press Tab until the handle of the page or group has focus. Its name says what it is and where it sits, for example “Reorder All Orders, in Daily. Use arrow up and down to move.”
- Press Arrow Up or Arrow Down to move it one step. A page at the top or bottom of its group moves into the group above or below.
- To make a longer move, press Space to pick the item up, the arrow keys to move it, and Space again to drop it. Escape cancels the move and puts it back.
Remove a Page, Delete a Group, or Start Over
- Remove a page. Select the X at the right of its row (Remove from Home), or switch it off in the library. The page itself stays in Arcus. It only leaves your Home menu.
- Delete a group. Select the trash can beside the group’s name. When the group has pages, pointing at the trash can shows Delete the group and the pages in it, so its pages leave your Home menu too. Cancel brings the group back as long as you have not pressed Done.
- Start over. Select Reset to default at the bottom of the panel to remove every group, so that Home shows only the Dashboard. It is a draft change like any other: Done saves it and Cancel keeps your groups. With no groups the button is turned off, and pointing at it shows Home already shows only Dashboard.
Save or Discard Your Changes
- Select Done to save. Arcus saves the whole menu in one step and confirms it, for example Home menu saved: 2 groups, 8 pages. The editor closes and your new menu is in the panel. If you changed nothing, Done simply closes the editor.
- Select Cancel, or press Escape, to stop. If the library’s search box has words in it, the first Escape clears them. When you have unsaved changes Arcus asks Discard your changes to Home? and explains Your Home menu goes back to how it was when you pressed Edit. Nothing is saved. Choose Discard changes, or Keep editing to carry on.
Add a Page Without Opening the Editor
Every page row in a department panel, and in the Settings and Organization panels, has a small plus button at its right end.- Open a department in the rail, or open Settings or Organization.
- Point at a page, or tab to it. The + appears at the right end of its row.
- Select it. The menu is titled Add to Home. Choose one of your groups, or New group.
Why a Page Is Missing
Your Home menu and the library follow the same page access rule as the rest of the navigation. A page appears only when your role in the entity you are working in can open it and the page’s module is switched on for your organization. If a page you expect is not in the library:- Your role cannot open it. Ask an administrator to review your role. See Roles and Permissions.
- Its module is switched off for your organization. An administrator can check Settings > System > Modules. See Modules Settings.
- You are in a different entity. Your role can differ between entities, so check the entity in the workspace pill.
- If you lose access to a page, it leaves your Home menu. The editor keeps it in its group, marked not available to your role, so nothing you arranged is erased. It returns by itself if your access returns, and you can remove it for good with its X.
- If a page is retired from Arcus, the editor marks it no longer available and Home leaves it out. Remove it with its X.
- A group with no pages you can open is hidden from the Home panel. It still shows in the editor.
Each Entity Has Its Own Home Menu
Your Home menu belongs to you and to the entity you are working in.- Switch entity and the Home panel changes. It shows the menu you arranged in that entity. An entity where you have not arranged one yet shows only the Dashboard.
- Your role can differ between entities. The same page can be available in one entity and missing in another.
- Switching entity while you edit ends the edit. Your unsaved changes are dropped, nothing is written, and Arcus says Editing Home was cancelled because the entity changed. Press Done before you switch.
- Your Home menu is saved with your account, not in the browser. It follows you to another computer, and when you save in one window, your other open windows pick up the new menu.
Use Your Home Menu on a Phone
Below 1024 pixels wide, which covers phones and many tablets held upright, Arcus replaces the rail and panels with a bar along the bottom. It carries up to four quick tabs, Dashboard, Orders, Products, and Fulfillment, each shown only if your role can open it, and More.- Select More. The Navigation sheet opens.
- Select Home. It opens by itself when you are on the Dashboard.
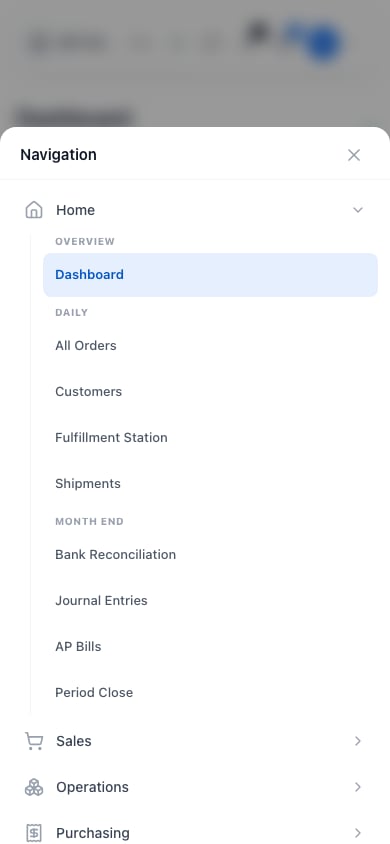
On a phone, More opens the Navigation sheet, and Home lists the same groups in the same order.
If Something Looks Different
- I cannot find Edit. Edit is only in the Home panel. Select Home in the rail first. In a window narrower than 1024 pixels there is no rail, so Home cannot be edited there.
- The editor says Home cannot be edited here. Your Home menu was saved by a newer version of Arcus. Reload the page and try again.
- A page will not go in. The notice names the reason, for example A group can hold at most 40 pages, and Home at most 200. Remove a page before adding another.
- A group name is refused. A group name needs 1 to 40 characters.
- A group I made is not in my Home panel. A group with no pages you can open is hidden there. It still shows in the editor.
The Workspace Header
The header runs across the top of every page.
The workspace header: the entity and location pill, history arrows, global search with Arcus AI, and the status, messaging, notification, and user controls.
- The workspace pill, holding two separate dropdowns: the entity you are working in and the location your lists are filtered to, followed by a
LIVEorSANDBOXchip. See Switch Entity and Location. - Back and forward arrows for moving through your page history inside Arcus.
- Global search, in the middle, with Arcus AI beside it.
- Status, messages, and notifications on the right. A downloads icon appears here only while you have an export running or ready to collect.
- Your user menu, showing your name and your role in the entity you are currently in.
Global Search
Use the search field in the header to find orders, products, and accounts quickly. The keyboard hint in the field shows the shortcut, so you can open search without reaching for the mouse. Search also finds pages:- Type a page or section name to jump to it. Searching for a section such as Warehouse or Inventory finds the page that section opens, and section names rank that page ahead of unrelated settings results.
- Only pages you can open appear. A page is listed when both its own permission and the access rules of the area it belongs to allow you in, so search never offers a page that would refuse you. If a page you expect is missing, ask an admin to check your role.
Breadcrumbs
The breadcrumb sits at the top of the page content rather than in the header. It shows where the current page lives and lets you step back up without using the deck.List Pages
Most modules begin with a list page. Lists usually include search, filters, status tabs, sortable columns, pagination, row actions, and a create button. The same habits apply across Orders, Products, Accounts, Purchasing, Accounting, Returns, and Fulfillment.- Use search for exact names, IDs, SKUs, order numbers, and account names.
- Use tabs for status-driven work queues.
- Use filters for date range, location, channel, type, payment status, or fulfillment state.
- Click a row to open the detail page.
- Use row actions for quick work only when you are sure you have the correct record.
Detail Pages
Detail pages hold the full record. They usually include a summary, tabs, document links, activity, related records, and actions that change based on status and permissions.- Orders: line items, payments, invoices, fulfillment, shipments, notes, and documents.
- Accounts: overview, addresses, contacts, payment methods, documents, transactions, and communications.
- Products: overview, inventory, pricing, shipping, serials, kit components, and purchasing details.
- AP and accounting: bills, checks, credits, journal entries, bank reconciliation, and reports.
When Navigation Looks Different
- Missing page: ask an admin to review role permissions and entity membership.
- Missing data: check the entity and location in the header pill first, then the status tab, date range, and search filters on the page. See Switch Entity and Location.
- Action disabled: check record status, required setup, permissions, approval rules, and accounting-period controls.
- Wrong environment: confirm the
LIVEorSANDBOXchip on the pill before creating, editing, fulfilling, posting, or paying records.